Growing up, I don’t recall ever seeing any heavily sweetened Thanksgiving side dishes on our table. I’m talking candied sweet potatoes with marshmallows, green bean casserole with condensed cream of mushroom soup, and jellied cranberry sauce shaped exactly like the can it came from. Instead, our celebrations were more like the traditional American Thanksgiving, and we ate what we harvested from the garden. (Canada’s Thanksgiving is just that, a Harvest Dinner that received fairly minimal preparation, letting our harvest shine.)
I didn’t encounter sweet potatoes with marshmallows or the ubiquitous green bean casserole until I reached my 20s. According to my newfound cohort declared, I must have been severely sheltered and completely deprived as a child…ha ha ha.
When I was finally “enlightened” to the gloriousness of these foods, it was a total let down. I truly didn’t understand the allure. I found these dishes heavy, cloying, and, frankly, just not very good at all. Perhaps because of my upbringing, my taste buds prefer vegetables that shine on their own rather than treated as something they’re not.
Yet for many people who grew up with these quintessential comfort foods, Thanksgiving is just not Thanksgiving without them. That means I’m usually the one who brings the “boring” side dish so I can at least eat one thing I enjoy. But I always hope my dish will entice my fellow Thanksgiving-ers to stray out of their comfort zone and try to appreciate vegetables for what they are: delicious and nutritious. Vegetables don’t need excessive amounts of sugar or heavy sauces that only mask their flavor. It’s no wonder that most people end up feeling so bloated and groggy after a meal like that!
At the end of the day, I always prefer minimal preparation for my vegetables. Steamed and buttered is my go-to. But sometimes, especially for a holiday or other special occasion, I look for ways to dress up my veggies without taking too much of their natural goodness away. Something that will appeal to me and (hopefully) my guests.
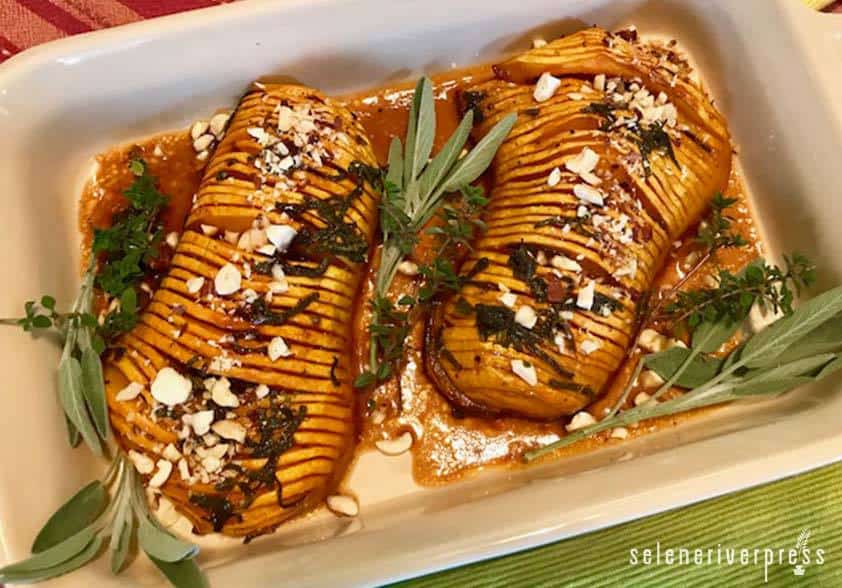
This squash dish hits all the right buttons. It’s slightly sweet, and if you’ve never seen Hasselback squash (or potatoes), you’ll find they’re simply beautiful to display. In case you’re unfamiliar, this method involves slicing the vegetable into thin crosswise slices while leaving it joined at the bottom. As it bakes, the layers fan out into crispy rounds, but the interior is still creamy. It looks like you slaved away at it, but it’s surprisingly simple to prepare—just be sure to use a sharp knife for precise cuts.
For smaller parties or eating at home on a normal night, I love using adorable, tiny squash (with a single half enough for one hearty serving). But for bigger crowds, look for large squash. Displayed on a platter and adorned with fresh herb sprigs, they make for a particularly outstanding presentation,
Herbed Hasselback Butternut Squash with Dijon-Maple Glaze and Hazelnuts
Serves 4
Prep time: 10 minutes
Cook time: 45–60 minutes or more, depending on size of squash
Ingredients
1–2 oz. hazelnuts or pecans, toasted and chopped
1 large (or 2 small) butternut squash
4 tablespoons butter, melted
2–4 tablespoons maple syrup (or to taste)
2 tablespoons Dijon mustard
1 tablespoon fresh lemon juice
2 tablespoons chopped sage
2 tablespoons chopped thyme
Salt and pepper
Special equipment: pastry brush, chopsticks, or 2 wooden spoons of equal thickness
Instructions
- Toast nuts in a 350°F oven until fragrant and lightly browned, approximately 6–8 minutes (be careful not to burn). Set aside to cool before chopping.
- Set rack to top third of oven and increase temperature to 425°F.
- Peel butternut squash with a vegetable peeler, then peel the white-ish layer under the skin, revealing the bright orange flesh underneath. Using a sharp knife, cut squash in half lengthwise. Scoop seeds out and discard. Place squash cut side down on a baking sheet and roast at 425°F for 15—20 minutes.
- While squash bakes, combine melted butter, maple syrup, Dijon, lemon juice, and chopped herbs in a small bowl. Season with salt and pepper. Set aside.
- Remove squash from oven. Let cool until you can handle it, about 5–10 minutes. Place one half cut side down on a cutting board. Place a chopstick or a wooden spoon lengthwise next to each side of the squash (this will prevent your knife from cutting all the way through). Next, cut narrow slits (about the width of a nickel) crosswise down the length of the squash. Stop slicing when the knife hits the chopsticks. Complete with remaining squash halves.
- Transfer squash (sliced side up) to a baking dish or roasting pan. With pastry brush, liberally brush each squash half with about ⅓ of the maple glaze. Try to ease some of the glaze between the slices, if possible. (This might be hard the first round, but as the squash cooks it will get easier.)
- Add about ¼ cup water to the bottom of the baking dish to prevent the glaze from burning. Return squash to oven and bake an additional 15–20 minutes. Remove from oven and repeat process, using another ⅓ of the glaze and adding a little more water to pan. Return to oven a second time for an additional 15–20 minutes. Repeat these steps one more time, with remaining ⅓ glaze, adding extra water and baking until tender, about 20 minutes. Check regularly to ensure glaze isn’t burning. Periodically add a little more water to the pan.
- Once cooked and tender, keep warm, spooning some of the syrup in the bottom of the dish over squash to keep it moist. Sprinkle with chopped hazelnuts just before serving.
Image by Briana Goodall.


I was just thinking yesterday I needed to find a good side dish to bring to Thanksgiving this year. This is perfect! I’m so excited to try it!