
Ask Chef Phyllis:
It’s almost Valentine’s Day, and although this is supposed to be a holiday for sweethearts, I always celebrate it with the children and some lady friends too. I send little heart candies and homemade chocolates or treats with a cute little Valentine’s card. I know when I get something like this, I feel remembered and special. Other years we make turtles with caramels—but it’s not easy to work around hot caramel with children, ages three, four, and six. Any suggestions for easy recipes for chocolate fun that children can manage? Nuts or no nuts is fine, and coconut is good too. But please remember, I have little time as I’m a working mom of three.
—Marilyn T. from Baton Rouge, LA
Let me go on record to say that it’s never too early, Marilyn. Children are never too young to be introduced to safe kitchen skills. Making candy is a great place to start. This recipe is child-friendly and super easy, so get ready, get set…GO!
I love it when I’m remembered on Valentine’s Day, whether it’s by my lady friends, gentleman friends, and kids alike. Valentine’s Day isn’t only for lovers anymore, although some think it started as a celebration of romance. According to some theories, the holiday is on February 14 because birds begin to look for mates in mid-February. With spring in the air, it’s a good time for lovers to make plans too.
Whatever the reason, making candy with your children creates a memory they won’t soon forgot—whether it’s on Valentine’s Day or not. I sweetly remember as if it were yesterday cooking with my mother and grandmother in the big old farmhouse kitchen at the back of the house. I was as young as five years old, barely tall enough to see over the kitchen table…and I still remember that squeaky Dutch door! Poppa, my grandfather, would leave the vegetables he picked earlier in the day on the half open door for our lunch.
Back to kitchen safety. When it comes to hot items and children in the kitchen, the first rule of safety is to make sure everything is in place (the culinary phrase is “mise en place”). Also make sure the recipe is easy enough for the youngest to bring something to the mix. With this simple and easy treat, the three-year-old can be in charge of the delightful job of sprinkling the salt. This, I assure you, will make cooking a pleasure and create good memory for you and for them.
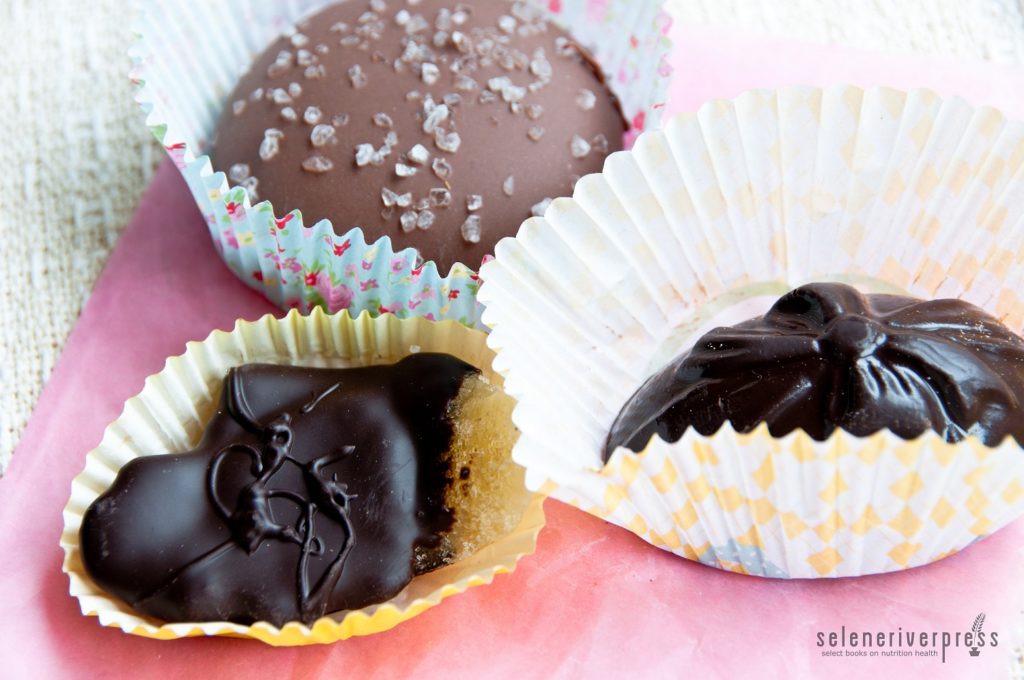
Top of the charts for flavor these days is sweet and salty. These chocolate clusters require some coordination but hit both tastes. The recipe is super easy and adaptable if anyone is allergic to nuts.
Chocolate Sea Salt Nut Squares or Clusters
Chef’s note: I chose not to use the optional honey or maple syrup since the flaky sea salt neutralizes the slightly bitter aftertaste of the dark chocolate. The salt hits the tongue first before you taste the nuts and chocolate, fooling you. It has delicious flavor even without any sweetener!
These tidbits were the perfect size and satisfied my chocolate needs much more than I could have ever imagined. Try them sometime soon. Yields about 18–24 pieces.
Ingredients
2 cups or more dark chocolate chips or pieces, divided (I used Thrive Market Organic Dark Chocolate Chips)
⅛–¼ teaspoon salt
2 cups pecans, walnuts, pistachios, and/or hazelnut pieces, toasted and cooled, or 1½ cups unsweetened coconut or raisins
1 tablespoon honey or real maple syrup (optional)
1 tablespoon flaky sea salt (I used Cyprus white flake salt)
Special equipment: 8×8 pan (preferred for small children) or 24 mini-muffin pan with paper liners
Directions
- Generously butter the 8×8-inch pan, or line the mini-muffin pan with paper liners.
- Place 1½ cups of the chocolate chips in a microwave-safe bowl. Melt in microwave on high at 15-second internals until just melted (or you may use a double boiler over barely simmering water until chocolate chips are almost melted). Let cool for 5 minutes.
- Add the remaining ½ cup chocolate chips, honey or maple syrup (if using), and salt. Stir until smooth. Cool for 5 minutes, then add nuts (or coconut or raisins).
- Scrape mixture into prepared pan and smooth the top well. Refrigerate 5 minutes, then top with a sprinkling of sea salt from up high so you can see its distribution.
- Refrigerate for at least 1 hour before cutting into ½–¾ inch squares (if using square pan). Store in an airtight container in a cool place. You may place each square into a paper cup if you wish.

Image from iStock/ErikaMitchell.
Phyllis Quinn is a chef, food writer, and founder of Udderly Cultured, a class that teaches how to make homemade fresh mozzarella, butter, yogurt, cottage cheese, and other cultured products. Private lessons are available. For a reservation, call Phyllis at 970-221-5556 or email her at phyllisquinn2@gmail.com. Rediscover nearly lost cooking methods and get one-of-a-kind recipes in her books The Slow Cook Gourmet and Udderly Cultured: The Art of Milk Fermentation.
Products by Phyllis Quinn
All Books
